Creating the Perspective with the View Frustum

Introduction:
In this blog I will be writing about how to solve the perspective problem for a 3D video game. I will be showing how I came to my solutions and explaining what I did, this will not be a code along tutorial on how to solve the problem. I will be first explaining how I solved the perspective problem. In my solutions I have only used C++, SDL2 and modern OpenGL so I had to write the maths myself.

Finally, there is maths involved but it’s only in concept and you wont be required to do any maths to understand what I am talking about. However a little understanding of Linear Algebra will help. In the final section I talk about the code I used, a little understanding of Object Orientated Programing will help you there to.

Understanding Perspective for Video Games:
What is perspective in a video games? When rendering 3D objects in space you need to be able to judge depth and this is what perspective allows you to do in real life and in video games. Effectively you need to see objects in the distance to be smaller and objects closer to the player to be bigger. Without perspective everything looks the same size no matter how far they are, which is very bad.

The two solutions:
There are normally multiple ways of solving problems in maths and especially in computing, but some are better than others. One solution would be to scale everything depending on the distance it is from the camera. Sounds great right? No, this is a horrible idea doing this for millions of object would cause massive strain on your game and you would be rewriting the same code over and over again, which is always bad. The best way to solve the problem is using the View Frustum and matrix multiplication this allows us to apply linear system of equations very easily and this comes with the added benefit of 3D object no longer have to care about scaling.

The Algebraic View of the View Frustum:
Now I have completed the introduction and I can talk about the View Frustum properly. We need to first define the View Frustum which is a space were everything in the scene is rendered and also applies perspective. Also each graphical object needs to have its own coordinate system called local space and its own transform for movement. So now because every object has its own transform we can apply the View Frustum to that object before drawing it. The creators of OpenGLU has online a matrix view of its function gluPerspective so we can look up the maths for a View Frustum:

codecogseqn1

and the function g defines the matrix:

codecogseqn

For more information and source link: https://www.khronos.org/registry/OpenGL-Refpages/gl2.1/xhtml/gluPerspective.xml

The Geometric View of the View Frustum:
Now to understand what to do next we need to be able to define the variables used in the function. I will go through each of the labels which are the variables in the function. The geometric view looks like this:view
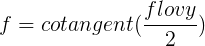
The first variable I want to talk about is the variable C this is just the camera position which is at coordinate point (0, 0, 0). Next is the flovy variable which is the angle in degree from the top and the bottom of the View Frustum. The aspect variable found in the function g is width divided by the height of the View Frustum which is normally just the width and height of the window. Now the zFar plain is the draw distance of the game world, so if any object is beyond this plain it wont be drawn on screen. The zNear is the opposite so if an object approaches and goes behind the zNear plain it wont be drawn either. Note objects can be sliced in half if they are half in and out of these plains.

In my video game I defined my View Frustum flovy at 70 degrees (45 degrees also works well) if this is too small then then things look squished. The View Frustum zNear to be 0.1 away from the camera position and the zFar to be at 1000. So that means everything between 0.1 and 1000 will be drawn between an angle of 70 degrees.

The Implementation of the View Frustum:
Now there’s a lot of code goes into creating a video game so I will only be focusing on the stuff important to the View Frustum. Firstly you need to understand that every object, even objects that don’t move has its own transform which will be multiplied by the View Frustum in a file called the Vertex Shader. So I counted the objects and wrote a for loop for the amount of objects I have in the game. So lets see it in action:
imp
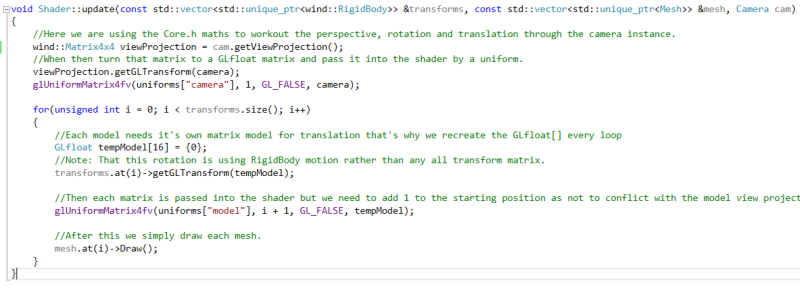
The Camera instance called cam creates the View Frustum before the loop begins with function getViewProjection(). After that we take the data and pass it into the Vertex Shader. Then each object gets a new temporary empty 4 by 4 matrix to be filled with the objects transform, this is then filled with the objects transform with the function getGLTransform(), that is all taken to the Vertex Shader.

As we are drawing our scene we do a matrix multiplication with all the objects in the vertex shader which looks like this:

imp2

The gl_Position is OpenGL speak for final position and vec4(position, 1.0) is just to turn the matrix into a vector for positioning. That’s not important though as you can see the camera which is the View Frustum in this example is multiplied by the model which creates the perspective we needed!

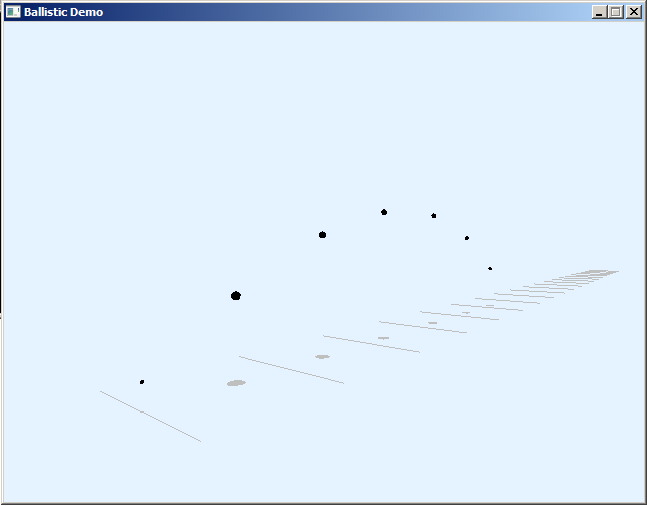
So the finally result is this:

result

Please be aware that this isn’t the full code for an application and my project is still a work in progress. An improvement would be checking to see if the object is inside the View Frustum and only loop through them rather than everything.

Thanks for reading!

Years of Failure

About a year ago when I was developing my engine I told my little sister about what I was doing and showed her a small broken demo, she got really excited and began to get pretty involved in the progress of development and every week she would ask, is it done yet? After awhile of asking she figured that I was never going to finish, got bored and did other things while I continued to work. Lately I have been thinking it’s a good question, why isn’t it done yet? Why is it taking so long? When is it going to be finished? Well after a year and a half I will answer these questions, I hope you enjoy reading my story of game development.

I started 3D game development right after I had finished my last 2D game code named LittleRPG after months of working on a 2D game I grew tired and furstated of how everything was turning out. There were 100 things wrong with it but the one that annoyed me the most was the collision and how ugly it was, it was aweful! I thought to myself that it was time to study physics and get good at it, at the time I had no idea what I was getting myself into. By my own set of princles I told myself that I should only build games with my own software, I didn’t want to use someone elses engine or something like XNA. Nope just C++, an API and little old me. So it was time, to really understand physics and once I understand that I can do ANYTHING! I thought to myself. Oh how naive I was.

My mathematical ability at the time was much to be desired, I didn’t even know what a Vector was and I thought Linear Algebra and Elementary Algebra where the same thing. So when I began I was shocked by how much maths I would need to learn. So I started with the Vector basics all the way up to some Vector calculus and Vector trigonemtry and some basic Matrix maths to. Along with some complex harmonic motion, Issac Newton’s first and second law of motion and some other physics based maths, such as drag force and Isaac Newton’s gravitational law and finally I did it! After all my hard work I learnt all the maths I needed to know, yay! Go me! I then built my first few physics demos after afew months of building I felt I had mastered everything and now I’m finished I thought. I just have to finish rotation, easy right?

Nope, rotation was very diffcuilt. I had to learn an entire new number type called Quaternions which still gets me confused to this day. I learnt new matrix maths for a 3 by 3 and 4 by 3 matrics and Issac Newton’s third law of motion and his laws of rotation. Working though different types of forces took a long time to such as buoyancy forces and gravity for rigid bodies. Then integrating all this together from 60 frames per second to get the transform matrix the final product of everything, but at last I had finished all the maths I will ever need, no more Quaternions, Torque and Inverse Inertia Tensors just me and the game left to do, or so I thought. It took a full year to finally get rid of all the bugs and get something that was playable, a flight simulator something I am very proud of, even if it’s not fun at all and the graphics make it look like a game from the 70s. Still, all I have to do now is the collision detection, easy right?

Again no! This was even harder still because it used everything I had built up to point and brought it all together. If there was even a slight mistake(which there was) at point in my maths or code the whole application would fall apart. Now I was working with a Binary Search Trees to work with intersection of Bounding Volumes that update the collision data of the space and location of all the geometric primitives in the game world. The contact algorithms which tells the program when and where the geometry has been contacted by communicating with the collision detection algorithms. All this maths and code all coming together to resolve the collision in a realitic way.

In thoery that is how a physics engine works but mine is currently a failure, it doesn’t work right. There still is alot to do with the collision detection and the contacts system to even get a simple demo  to work right. Right now everything just bounces off the screen or there no collisions happening at all. I still have a long way to go and I am a total and complete failure because I have nothing to show for my work, or am I?

Indie game development may look like a place of great people making great games and making alot of money out of it. I mean we all know Minecraft and how much money that made or Super Meat Boy, Braid, Castle Crashers etc. The truth is you may never ever get any anything for your hard work, people might not care or even take a look at your project that took years of your life to make.

So when you are starting to make games it is very important to know that all and any of your games may not be successful, no matter what you do or how much hard you work put in. It doesn’t matter how much maths you know, even now if were to finish a game people might not even care. You see when creating a game is not about the pot of gold at the end of the rainbow, creating is about conntecting with people, communicating an idea or a story, sharing something of yourself through your game.

So when is it going to be finished? Simple answer is I don’t know, everything has taken longer than I expected, and I don’t know what I don’t know so there might be even more to work through. Getting the collision detection to work might take another year, and everything else I want to do might take even longer but regardless if I finish or not I will keep on going because even though I have “failed” it’s been worth it.

Thanks for reading.
Dan.

From Particles To The Mass Aggregate Physics Engine

From particle engine to a mass aggregate physics engine which is the fully developed version a particle physics engine. Development has been really slow due to university taking up alot time, but here we are the next stage finally completed.

A mass aggregate physics engine is a name given to a a physics engine that uses particles simulates force such as attraction or repulsion and the simulate of ropes and rods which link particles together. This means you can start to build structures and start to build basic levels.

This is an example of what you can build with just mass aggregate physics
In this video there is a red sphere which has mass would be the player each black sphere are more particles and the pink lines are simulating rods, these rods do not change in size. The structure that was made with these rods was made by connecting the particles which are the black dots together and because they are put together by rods they simulate a shape. The mass of the player sphere moves the shape around.

This is an example of using a force generator used with mass aggregate physics
In this video you can see that we have more rods which are used as platforms. The red circles are particles, each particle has a particle force generator built into them which in pulls and pushes each other closer and further away. This type of physics was used in a games such as the LocoRoco and Gish, the particles make it a body look more like a fluid soft body entity. This is the idea of this behind this physics demo to try and simulate although because the platform position and steepness is based of random binomial generator making this hard to record.

This is an example of a small level that was created using different types of particle physics simulation
There are two main types of links that link the particles together in this demo, rods and ropes, unlike rods ropes are able to contract and like a spring would, so they don’t perfectly simulate graphically rope but it physically behaviours are very similar to a rope. This difference gives different structures a restitution or a bounce which gives the engine more flexibility making new structures. The orange/brown lines are anchored ropes which simulate the swaying bridge, when a rope has an anchor point this means it will only one end moves and the other remains still. The green lines are ropes without an anchor point causing even more swaying and warping of the platform on the bridge. Red lines are rods without anchored points giving structure to the bridge without restricting it too much. Finally the two black lines are rods with anchored points, these links restrict swaying motion creating more of a straight still platform.

Sadly I am still unable to create a playable game with this physics engine because two very important parts that have not yet been built which are a general purpose collision detection system to handle different object crashing into each other and there is no way handle rotation which would and linear movement of objects needs to be implements. It is true that games have been developed using mass aggregate engines but they did have had a more general purpose collision detection system, where mine collision detection system is rather ad hoc and not really useful outside moving across that bridge in the third video. Again because these huge parts haven’t been implement the simulation isn’t quite right yet, as you can see with the shaking and inaccuracies.

So the next step in creating a physics engine is to build rigid body physics which is what people think of when the name 3D comes to mind, so this is the last time I will be directly implement new particle based effects. I am glad to move onto the next stage in development.

The Beginning of a Physics Engine

Hello I am back again to post game development stuff. Although I have been away for awhile I have been working, lately I started to develop a physics engine in 3D in the language C++ and the API SDL2 and OpenGL which is used for graphics. So these blogs will show my progress through of a physics engine, my goal this time isn’t to make a game for release, this time I will to try and build the best game engine I can. This goal is not small task I do understand this but, this will be a continuous project of mine, rather than something that I will finish. This means if I get stuck on something I will need to go away and learn about and get better and build it so updates my take some time.

What I have so far is what is called a particle engine, a particle engine is something that simulates particles. A particle isn’t a quark or eletrons, a particle in a physics engine is an object like a bullet or a spark. It’s the simplest object to simulate in a physics engine and particles are normally used for effects, such as fire and smoke or bullets. This took awhile to build mainly because of all the maths involved and it is becoming the biggest project I have ever worked on. So here are some pictures of ballistic demo, which shows the particle engine in action:

Lasers1 Canno Lasers1Granade1

The first picture is picture of a laser bullet simulation with very little mass and it moves very fast. The picture to the right to the laser simulation is a picture of a cannon simulation which has alot of mass and doesn’t travel fast or far. The picture of the bottom left is a picture of fireballs with move very slow and upward as it travels, this times out at a certain point because it is so slow to move. The last picture is a grenade hand simulation which has more mass than the bullets but less than the cannon, because the mass isn’t too high it travels pretty fast and far. The number just tells you that the demos are running at 60 frames per seond.

This is the first demo I will be creating, I have so much to learn and practice but I am proud that a total of 3 years of coding in C++ has lead to this. I can’t promise quick updates because the complexity of the project is so high, I might need to go away and teach myself new mathematics or some low level CPU/GPU architecture to really get the engine running smooth and correct, which will take time. All in all this is just the first step for a fierce climb up a huge high mountain.

Thank you for reading, Dan.

The Quest Continues

Lately I haven’t been updating my blog every Thursday like I promised because of two reasons, I don’t feel a week is really long enough to make real progress enough in game development to give an update on so in the future this will be the norm, and I have been busy with studing for my Maths exams, which has been taking up time.

Over the last 2 days, I decided to start over and make my game completely based off a tutorial, due to my lack of success. My last project was a 2D platformer, this may seem irrelevant at first to this project a 2D RPG, but the game logic I learnt over the development of the 2D platformer was very different to a point and click type RPG, this has lead me making afew beginner mistakes that I had to work out, which slowed me down. For example, in a 2D RPG the technique to move chacater are complete different to a 2D platformer. In a 2D RPG like old Pokemon and old Zelda games move the camera and animate the player walking giving the illision of movement, but in my 2D platformers you move the player with the camera at the same time and move the background image backwards, so it looks like a continuous world. So being furstrated by slow progress and inspired by recent events, I went on a coding sprint and did what needed to be done so this is game so far:

Image Image

So, there is a little difference between this update and the last update. Firstly the camera works now, you can move around a larger area than the screen, giving the level more places to explore. There are now trees in the environment, the trees are made up of 2 sprites a trunk and a green circle which can be added to any point on the in a small level editor, the corriates of the tree sprites are saved to a separate text file which is read back into the game, so you design your own levels quickly. Also the drawing logic is set up so when you walk behind a tree trunk you stay behind the tree trunk, and when you walk past the tree and go left or right over a tree, you will walk infront of the tree, giving the environment depth. The white box at the bottom of the trees and the player feet are collision box sprites, these are there to show the where the collision is being detected, this is only for debugging purposes and in games that use this technique they are deleted before release, so if I managed to release this game, they wont be there.

The next step major is to refactor, refactor and refactor, I am not happy with the current way my code is built, the classes that hold the code do to much, it needs to be spilt up into smaller classes so I can reused the code. Another major problems is the frame rate, currently it runs at 62 frames per second, but that will only be the case on my computer, so if someone else were to run the game this on there computer the frame rate will be higher or lower, making the game run at unpredictable rates. After that I hope to add sprite effects, rotation to none collidable sprites and update the collision to be more effective and effectent currently the collision resolution bounces the player around if they walk into a tree trunk and finally I would like to change the art to make it more appealing to the eye. I wont be able to work on the game straight away, because of Uni work that needs to be done, but I hope to get this done as soon as possiable.

It’s funny, the effects of the heart and what is can make people do.

Also, I must thank CodeRad for helping my out, much and teaching me so. If you want to build your own version of this current build of this RPG take a look.

Design and Animation

Hello and welcome back to the second game development update of mine. In this blog post I think I will avoid placing code in the text, because of the formatting problems I had with my last post. Without further ado here I go.

This week has been a struggle to work on my project, mainly because of my University studies have been taking up alot of my time. When I have been able to work on my project, I have been coding the animation subsystem and refactoring the code. Animating the player is always tricky to get right, it really tests your code architecture and design. It turns out that using the keyboard to move the player and using the mouse to move the player completely changes how animation will work. I had to build a completely new animation system because all my past projects have used key presses so setting up animation took longer than I thought. Here are some picture of the animation in action:

ImageImage

As you can see the character animation runs in all four directions. To handle the animation, you need to calculate the raduis between the place clicked and where the player is on the screen. I used the function atan2(y1 – y2, x1 – x2); This function takes two set points and returns the value of the raduis of the two points, because I need to get the value in degrees I take the return value of this function and muiltply it that by (180 / pi)  and add to the value 180, this gets the value in degrees I need. After doing this calculation I built the logic to run the animation.

The logic of animation needs to be solid otherwise it looks aweful, this took me around 5 hours to get right. The logic compares the degrees calculated and different angle values which are all 90 degrees apart. Insided the if statements that tests the angle logic I have a  function that checks how much time has passed, this slows down the animation if I didn’t slow down the animation it would update every 1/30 of second, which is way too fast. Next I divided the total size of the sprite sheet by the number of sprites and increment a source rectangle by that value, which clips the sprite sheet into smaller images making look like the character is running around on the screen. Also I built a reset animaiton function so when the distance between the mouse is < 5 pixels it stops the animation on a standing frame, which stops the character from running on the spot.

Also I have started writing up a design document to keep track of my ideas I have for the game. The scope of game is very small compared to other games, but I do believe that a small game with good mechanics and story is better than a long boring one.

The game is still in the everly stages like last week so there isn’t much to show off but, the code is really starting to take shape and I hope to have camera set up by next week.

Here are the people that provided the art and tutorials that have helped me along: RadCode for the code and the character was drawn by Bloodpain

I hope you enjoyed this blog post. Dan.


Every journey begins with the first step or a mouse click

Hello and welcome to my first blog post, after being inspired by my friends art work that he has been sharing I wanted to start to post my own work. I hope to update this blog every Thursday and it will be about what learnt throughout the week and my progress.

So I am currently working on a little 2D RPG, at the moment it is in it’s early stages. I am currently building the core code that will run the game so there  is not much to show currently. I gave the my project the title Little RPG because, well it’s a little RPG I may change the name later. I am currently using a tutorial on Youtube to help with architecture of the code, you may recognise the art work from the tutorial, but am not coping the code line for line as you might expect instead am using it as a guide to help me along rather than walk me through the developement of the game. Note I am no game artist so the art is just open source art from the Internet. So without further ado here it is

Little RPG

So this is my project so far, as you can see there is not much to look at. You can move the small character around the screen with the mouse by holding the left mouse button and clicking. I have managed build in AABB detection collision and resolution which I am using to stop the player from leaving the screen. I was struggling with how to resolve collision with objects that change there velocity. I solved this problem by first dectecting the collision with AABB collison detection and then I stopping the movement of the player, by setting the players velocity to zero. Next I made sure that the players position was updated to right next to the other object it has collided with. Finally if the user presses another key or clicked away, I recalculated the players velocity so then the player can move in a different direction.

The next problem I faced was if the mouse moves slowly the character would bounce in all direction when the player follows the mouse. I found out that if I updated the players position at a constant rate regardless of the distance between the players and the mouse, it will update the players position too fast. This function slows I solved this problem.
//All of the other movement functions are the same as this one but handle different direction.
void Player::StartMovingLeft(float MouseX, float Distance)
{
//If the players position is smaller or equal to the offset.
if(mPos_x <= mOrigin_x)
{
//Then the position of the player should be at the position.
mPos_x = mOrigin_x;
}
else
{
//Here we reinitise the velocity after we have stop the player.
mVelocity_x = 0.325f;
//This if statement checks to see how fast we should update the players position. With this check if I move my mouse slowly it bouses the player around.
//So if the mVelocity bigger than the distance apart / 10 we
if(mVelocity_x > (Distance / 10))
{
//Set the velocity to the current distance apart / 10
mVelocity_x = Distance / 10;
//Then we update the position.
mPos_x = (mPos_x - ((mPos_x - MouseX) / Distance) * (mVelocity_x * mTimePassed));
}
else
{
//else we keep the velocity at a constant speed.
mVelocity_x = 0.325f;
//The position of the player is equal to the current position - mPos - the current mouse position / by the distance apart * the velocity * the current time.
//This makes for time dependant movement, which is useful if the framerate drops.
mPos_x = (mPos_x - ((mPos_x - MouseX) / Distance) * (mVelocity_x * mTimePassed));
}
}
}

If you look at this function it handles moving the player up. In the second if statement it solves the problem by testing to see if the mVelcoite_x is smaller than the distance between the mouse and the player, I had to divided the distance by ten because the distance can only be above zero. So if the statement is true then I need to change the mVelocity_x to the distance divided by ten to slow down the players movement. If the distance is greater than the velocity then we move the player to point select at a constant speed, until the distance is very small again, in which case we slow down the player speed.

Well I hope you enjoyed reading through my first blog post, I hope you all have a great day. Remeber I am still a learning when it comes the game development so there might be mistakes in my code I have shown, so if you see any in this function or a better way of doing something let me know. Thanks Dan =] Sorry for the lack of code indenting, it seems that WordPress doesn’t want to space my code out.